Build It, Play It: Big Box Ark Project
- Maralee Allen
- Jan 23
- 7 min read

Updated: Feb 13
Is a stretch of bad weather impacting your kids’ outdoor play time?
Are you looking for a fun activity that lasts more than five minutes and doesn’t cost anything?
Try this Big Box Ark project! With it, you’ll be reinforcing a Bible story that teaches kids that God always keeps His promises!
Getting Started: Day 1
Visit a local furniture or appliance store. Most are happy to give away large empty boxes.
Fold down your new treasure for transport.
Back at home, since it’s already collapsed, turn it inside out… so the writing is on the inside. Tape it back together, but leave one end open for the door. (Duct tape works well.)
Cut off the top and bottom flaps, so the door opens and closes easily.


Time to "Build" the Ark!
Time for the kids to get busy and “build” the ark! You can either use paint, or if you're not feeling adventurous, markers do the trick just fine.
To avoid design disagreements with multiple kids, each can paint their own side.
Encourage lots of effort. It took a loooong time to build the ark!
Talk about how God told Noah how to build the ark and that God PROMISED that Noah and his family would be saved from the flood.


Once the paint is cleaned up, it’s time to gather food for the people and the animals that will be coming. At this point, it's fun to enjoy snack time inside the ark!


Getting Everybody Aboard: Day 2
Time for the animals to get on board. The more the merrier! See if some stuffies can come in twos. Make sure everyone who wants to come is allowed inside.
Talk about how God closed the door and PROMISED that the rain would start in seven days.
Beginners can practice counting to seven on their fingers.
Stay inside the ark and listen to a recording of rain. (You can listen to one here!)
Talk about how God PROMISED that it would rain for forty days.
Older kids can practice counting to forty. Try counting by fives or tens.
There is going to be a bit more crafting for this next part.
Make rain shakers.
Start with a paper plate.
Fold it in half.
Put a small amount of popcorn seeds or dry beans inside.
Staple it shut.
The staples need to be close enough together so nothing can slip out. Older kids can help press down the stapler when it’s in position. It takes a lot of muscles to make that double-click sound!
Prepare for crazy shaking by reinforcing the folded edge. (Masking tape works well.)
Cover the pokey side of the staples with masking tape.
Time to make it fancy and prepare for stormy sounds!


Take your rain shakers back to the ark. Make it rain as you count as fast as possible to forty. Then freeze!

Talk about how God PROMISED that the rain would stop after forty days, and that God PROMISED that Noah and his family would be saved, and they were.
Check out my Who’s in the Ark Song Activity that relates to when Noah and his family were on board the ark.
The Ark Has Landed: Day 3
The water is going down, and the ark has landed on Mt. Ararat.
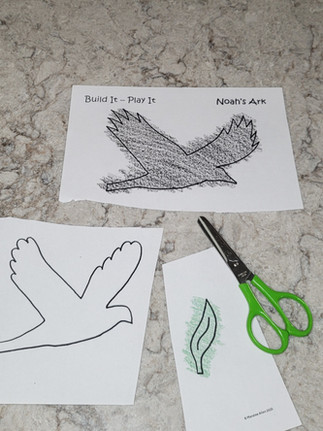
Talk about how Noah tried to figure out if it was time to leave the ark. You will need a simple raven and a dove to play with.
I am not an artist, but if you are in the same boat (ha ha!), feel free to print my very basic sketches for free here!
Colour the raven black and the leaf green. Do not colour the dove.
Optional - An older kid can have the harder task of colouring the back side (without colouring on the dove).
Scissor Skills = Great fine motor control practice!
Beginners can get help holding the scissors correctly and cutting the pictures apart.
Older kids can get help cutting around each picture.
If kids (or grown-ups) are picky, the little edges can get cleaned up!
Use two unsharpened pencils or two bamboo skewers for handles.
If skewers are the choice, cut off the sharp points.
Tape a handle to the back of each bird.
Now they’re ready to fly out of the ark.


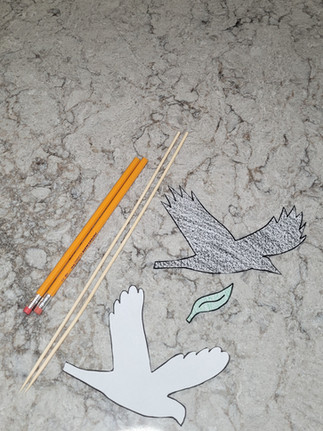


Back at the ark, cut a window in the side of the ark that the birds can fit through.
Send the raven out first. He can fly around the house but he doesn't go back through the window.
Then send the dove out. She can fly around the house before going back through the window.
The next time she flies out the window and around the house, she needs to bring back the olive leaf.


Time for a Game!
One person hides in the ark (pretending to be the dove). No Peeking! The other person hides the olive leaf.
The dove must go hunting for the leaf to bring back to the ark. Take turns!


Opening the Roof: Day 4
What did Noah’s family do to celebrate his birthday? It’s time to open up the roof of the ark!
What did they see when they looked around? The ground was dry, but still, God did not open the ark’s door.
Talk about how hard it can be to wait patiently!


Why not have a birthday party for Noah? Work together to decorate or to make a special dessert.
How old was Noah? Six hundred and ONE!
Invite some friends to the party! Try playing all the Big Box Ark games again, or some other party games.


Time to Leave the Ark: Day 5
God has told Noah that it’s time to leave the ark!

Talk about how happy the people and animals must have been. Noah said thank you to God because God had kept His PROMISE. Noah and his family were saved!
Talk about some things that you can thank God for.
God made a new promise to everyone on earth.

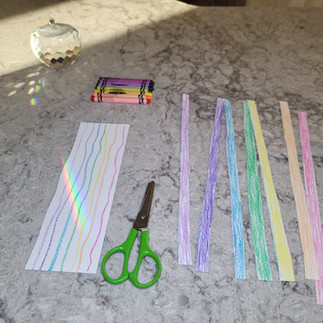
Talk about God’s rainbow PROMISE and find all seven colours to make a rainbow. red – orange – yellow – green – blue – indigo – violet
For Beginners – Fold the paper not quite in half in the landscape position. (left side of pictures below)
For Older Kids – Fold the paper not quite in half in the portrait position. (right side of pictures below)
For Beginners – using the folded top edge as a guide, draw a red line down the right-hand side of the paper.
For Older Kids – use red to colour the strip of paper that’s sticking out from under the top edge on the right-hand side of the paper.
Re-fold the paper to leave a new white strip down the right-hand side of the paper.
Use yellow to complete the next rainbow colour.
Keep re-folding to uncover the next uncolored strip until all seven colours have been completed.
Note: The goal for Beginners is to try to get their lines to not crisscross each other.
Time for scissors (and some fine motor control practice)!
Beginners can get help holding the scissors correctly and cutting straight across the paper.
Older Kids can get help cutting each colour strip apart.
Use two unsharpened pencils or two bamboo skewers for handles.
If skewers are the choice, cut off the sharp points.
For Beginners, tape the rainbow to the stick. Taping the top and bottom will keep it from sliding off.
Older Kids can help tape each strip onto the stick in the right order.
OOPS!! Time for me to get the scissors back out when I realized that I taped the Beginner rainbow upside down! (At least it was an easy fix.)


Time to blast some praise songs and play Rainbow Freeze Dance!
Day 6?
When you are tired of having a giant box in your living room, you can announce that Noah and his family have left to build new houses.
Some kids find this very sad. You may need to help them build a new house in their closet or a fort out of couch cushions to help start a new, fun adventure.
Once the sadness is gone, you can decide if your kids are emotionally strong enough to help you take their ark to recycling. If they are, it makes a great opportunity to talk about how we can work to help take care of the earth.
You can talk about how great it was that you upcycled the box and then recycled it. The box was used twice and will now be remade and used again!


No room for a giant box? You can still play Noah’s Ark with a big blanket and a table!

Tips for Telling the Story
I’ve worked with many groups of kids to build a Big Box Ark.
I would break the story of Noah into sections and tell each part of the story before introducing what the day’s Big Box Ark activity would be. Even if kids know the story, it’s fun to stop the story at the “cliff-hanger” spots.
It’s also a convenient way to review the story details without it getting boring by repeating the whole story.
One year, my entire class of kindergarten students all really loved acting. Each day, I would select eight actors and drape scarves on their heads for each different character in Noah’s family.
As I told the story, I would direct them in what they were to do or what they were to say. The girls in the class didn’t seem to mind acting as boy characters (since they all had specific names), but I was being careful with the boys in the class to not give them Mrs. Shem or Mrs. Japheth roles.
I shouldn’t have worried since after a few days, one little boy loudly complained, “When is it going to be MY turn to be Mrs. Noah?”
By the way, Noah’s birthday party can be SO fun with a little pre-planning and a bag of balloons!
Also, it’s totally OK if the ark is used for all kinds of other games too. It very easily becomes a rocket, a house, or a cave! Your kids’ imaginations are the only limit!


