Build It, Play It: The Easter Story Without Eggs
- Maralee Allen
- Apr 2
- 5 min read

Resurrection Eggs! What a fun activity that is all over the internet. I’ve done this with kids SO many times!
They love the colorful plastic eggs. It’s an easy project for them to put together, and they love using it to tell the Easter Story.
How could I possibly think of anything that could be better than that?!
In fact, I was complaining about this when my husband said, “Well, what about parents who don’t want to mix Easter Eggs into the Bible story?”
Well… now there’s a good thought – and a challenge!
What I came up with is a glorious mix of three widely advertised Easter craft ideas….
Resurrection Eggs, Easter Story Stones, and The Resurrection Garden
So… here it is…
Resurrection Garden Stones
I did the project two ways, and I like them both.
The first way is with real dirt, grass seeds and rocks. (Time and patience are required.)
The other way uses a simple salt dough mix.

Both ways require an empty cookie or plastic produce clamshell.
If you’re using dirt, make sure it doesn’t have holes. (You can line it with foil if needed.)
You’ll also need a small container to use as the “tomb.” A yogurt cup works great!

The Dirt Garden

Step 1: Fill the clam shell with potting soil.
I was going to do this outside to save on clean-up, but it had just snowed (Canadian springtime weather), and I didn’t want to go out!
Step 2:
Decide where the “tomb” will be placed and partially bury it, so the “entrance to the tomb” is uncovered. You’ll need to create a dirt hill to hide the rest of the container.
Step 3:
Dampen the dirt with a spray bottle and liberally sprinkle grass seed all over. Water the seeds, too.
Now wait and keep it warm and moist!
Tip: Put the container near the table as a reminder. The seeds can get sprayed at mealtimes.
Step 4:
Take a walk outside and collect 9 smaller stones and 1 medium stone that is big enough to cover the opening of your “tomb.” It’s helpful if the rocks are fairly flat on one side.
Wash them and let them dry thoroughly.


The Salt Dough Garden
If you don’t have dirt and seeds OR you don’t want to wait, try this instead.
Gather some items to decorate your garden.
I had a few leftover pompoms that I thought I could pretend were flowers.

I decided to make some trees using twigs and crumpled tissue paper chunks. I glued the “leaves” onto the “trees” so that the glue could dry while I made the salt dough.

Set up the base for your garden landscape. Position the “tomb” and use loosely crumpled foil to make small hills. Keep them in place with a bit of masking tape.

Now, mix up a batch of salt dough.
Salt Dough Recipe
This recipe was enough for 1 “garden” with the additional 10 “stones.”
2 cups flour
½ cup salt
¾ cup water
Mix together into a stiff dough (add a bit more water to combine if needed)
Pull out 9 small pieces of dough to make into stones and one larger piece to make into the tombstone. Flatten them a bit so they dry quickly and are easier to work with.

Make sure the tombstone is big enough to cover the opening of your “tomb” container.
After I took out the dough for stones, I decided to use food colouring to make the rest of the dough green for the grass.
I DON’T recommend this! It was messy and stained my hands. Plus, it took “forever” to work the colour through the dough.
Also, I think kids would much rather paint their “grass” after the dough dries.


Roll out the rest of the salt dough to lay over top of your garden scene. Remove the dough covering your tomb entrance.
Now it’s time to push any garden decorations into the dough before it dries!

The dough should be thoroughly dry in 1-2 days (depending on the thickness).
Paint the grass green, the rocks brown and glue on any extra decorations. I didn’t have brown paint and decided that the rocks could just be an off-white colour (instead of making a trip to the store).


Now it’s time to turn your stones into Resurrection Garden Stones.
Print off the Resurrection Garden Stones printable and cut the pictures apart. You will need to cut the edges down so that they fit onto the stones.


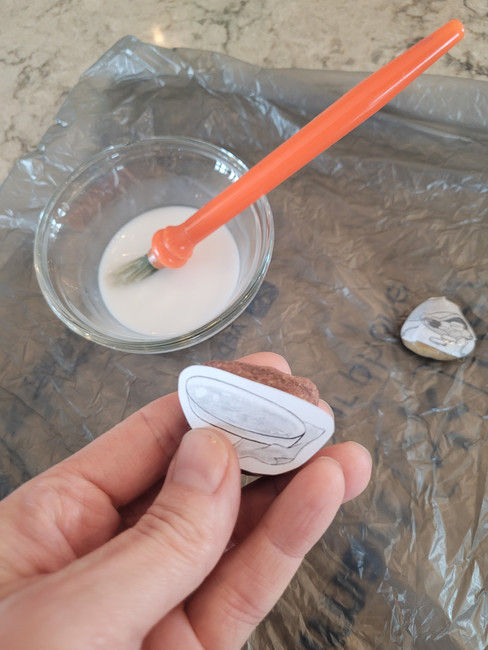


Talk about the part of the Easter Story that each picture represents.
(Suggested storytelling for each stone is also included with the Resurrection Garden Stones printable.)
Bag of Coins
Judas chose his own way instead of following Jesus. He decided to trade money for his friendship with Jesus.
Bowl and Towel
At the Last Supper, Jesus washed the disciples’ feet. He taught them the importance of serving others.
Bread and Cup
At the Last Supper, Jesus compared his life and death to bread and drink.
Praying Hands
Jesus prayed in the Garden of Gethsemane for God’s help.
Sword
When the mob came to arrest Jesus, Peter wanted to fight, but Jesus told him that it was not the right choice.
Rooster
Peter was afraid and denied knowing Jesus three times before the rooster crowed. He was very sorry for his mistake.
Crown of Thorns
The soldiers did mean things to Jesus and put a crown of thorns on His head.
Cross
Pilate gave the orders to put Jesus to death. Jesus was crucified on a cross.
Torn Curtain
When Jesus died, the curtain in the temple tore in half, showing us that we no longer need to be separated from God.
No Picture
Jesus was buried in a tomb on Friday, and on Sunday morning, He rose from the dead!
You can use a Sharpie to number the stones to help young kids keep the story in order.
Kids can pick up the stones in order and tell the part of the story that goes with the picture.
If you don’t number the stones, older kids can pick up all the stones and put them in order before telling the story.


My Recommendation
I would not make all the Resurrection Garden Stones at the same time.
The first day, I would have my kids make the first three stones and tell the beginning of the story.
The next day, I would review those three stones and then add three more.
The third day, I would review the first six stones and add the final four.
Spreading out the fun keeps the storytelling practice fresh!
Happy Easter!


